>Kite Blimp Method
Home » Research » Methods » Kite Blimp Method

Kite Blimp Method

Blimp Deployment - Field Check List

  • laptop computer, fully charged 
  • computer power cord
  • waterproof computer case         
  • camera                                
  • camera battery, fully charged
  • camera manual
  • USB cord from camera to computer
  • camera battery recharger
  • shutter hold-down used for deployment
  • tarp                                       
  • kite-blimp wrapped inside tarp 
  • numeric tiles, wooden
  • linoleum tiles, all
  • GPS case  
  • GPS data logger  
  • GPS antenna      
  • GPS antenna pole
    (two pieces taken apart will fit into bottom of case)
  • GPS batteries (4), fully charged
  • 12v battery, fully charged
  • power inverter
  • pressure regulator
  • air hose from tank to blimp
    (inside pressure regulator box)
  • two helium tanks, with safety tops
 
  • clipboard                                            
  • data sheets                       
  • pencils/pens/sharpie  
  • hedgeclippers                                                 
  • caliper                                                                  
  • swiss army knife                                                                                                                                              
  • First Aid kit                                         
  • life jackets                                                         
  • towel to shade computer, if needed

Items in white bucket:                  

  • blue clamp strap                              
  • two green clamp straps
  • two rubber tie-downs  
  • duct tape            
  • thread tape for pressure regulator
  • wrench to tighten pressure regulator                    
  • kite string and winder
  • rubber bands    
  • zip-ties
  • repair kit for blimp
  • tape measure                   
  • two pairs of gloves         
  • extra ziplock bags                           
  • first aid safety manuals
  • boating rules                     
  • extra rope at bottom of bucket
  • sponge


Kite-Blimp Protocol
Updated: 10-12-2011

Buying Helium

  1. Airgas in Woodland is the place to get helium.  We have 2 tanks.  Take an empty one and exchange it there for a new one.
  2. Sometimes there may be helium shortages, so call ahead to make sure they have it on hand.

Blimp transport

  1. Before leaving campus, be sure that you have all supplies needed by using the blimp field check list, located in the folder Y:\Projects\Wood\Wood_Documents\Field List.  Check that you have all items on the list and you are ready to go.
  2. Items loaded in the truck bed are the helium tanks, blimp, car battery, wooden tiles, and linoleum tiles.
  3. First load in the helium tanks and secure them to the truck with the clamp straps.  Use one strap around the bottom of the two tanks to secure them together.  Use a second strap to secure the two tanks to the truck, using the hook on the truck rack at the truck cab to help hold the strap in place during transport.  Use a third strap to secure the tanks to the truck at the neck of the tank safety caps.
  4. Place the 12 volt battery between the wheel well and the inside helium tank, against the side of the truck bed.
  5. Now load the blimp and tarp diagonally across the truck bed.  Place the wood tiles equally across the tarp then spread the linoleum tiles evenly across the tops of the wood tiles to hold everything in place.  The driver should watch for tarp blowing up from the truck bed – and stop to rearrange the tiles as soon as this occurs.  With all tiles evenly spread, this should not happen, but you should check the arrangement from time to time.
  6. All other equipment goes into the truck cab.

Tile and Blimp set-up

  1. Once at the site, set up tiles and GPS their coordinates before doing anything with the blimp.  The more tiles you lay out, the more tiles you will get in a photo closer to the ground and the better the ability to accurately stitch together the photos.  Make a crude map of tile numbers and locations so that you can match up pictures and tiles for analysis.
  2. First, prepare the helium tank using plumbers tape on the connector and tightening the pressure regulator onto the helium tank.  Open the tank valve and check for leaks.  I found that there was a small leak even with plumbers tape, but not too bad (could be the individual tank).
  3. Attach the clear plastic hose to the helium tank hose barb.  When putting away equipment, be sure this item is on top of the pressure regulator rather than underneath it, to prevent damage to the hose.
  4. Move the tarp and blimp to the top of the truck cab.  Determine the blimp’s direction – the input valve has to be adjacent to the tank so that the plastic hose remains attached to the blimp during the fill procedure.  Be sure the two release valves on the opposite side of the blimp are closed before starting to fill the blimp.
  5. At this point, attach the blimp to the truck with a green clamp strap.  Use the white blimp loop located near the junction of the stays for this attachment.  It is very important that the blimp is attached to you or to a solid object at all times!
  6. Now attach the black-taped end of the hose to the blimp, and turn the smallest knob on the pressure regulator to begin filling.    If the helium is noisy at the input valve, simply open the small knob some more.  The large knob can also be manipulated.  I believe it regulates how fast the helium from the tank can flow through the pressure regulator.
  7. It does not take long to fill the blimp, about 5-10 minutes.  There is a string that is attached at the top and bottom of the blimp that assists in navigation.  While filling, position this string so that as the blimp tightens, the string on the fill side is positioned close to the input valve and the string on the far side is positioned between the two release valves.
  8. Toward the end of the fill, it is possible that the pressure inside the blimp will pop the plastic hose off of the input valve, so you may want to hold the valve/hose connection at this point.  Note: the whole valve pulled out of the blimp during one deployment as I was pulling the plastic hose off of the valve.  The valve is now inserted further into its opening and seems to be doing fine.  The position of the valve no longer permits the valve cover to attach to it.  This does not seem to be a problem either in flight or in storage.
  9. The amount of helium used to fill the blimp is ~ 900-1000 psi.  An entire helium tank holds ~1800 psi, so you can get 2 fills per tank.
  10. The blimp is full when the strings are tight and the multiple creases at the seam are smallish.  Remember that the goal is not how much helium can we get in the blimp; all we want is enough loft so that the blimp is capable of lifting the camera.
  11. During the fill time, you should be straightening out the blimp’s stays, positioning the blimp strings, tying the ribbons to the stays (do not make knots!), and generally making sure that the blimp’s mechanics look functional.
  12. Once the blimp is full, tie the kite string to the blimp feeder string.  We’ve attached the string to the blimp with knots, then have duck-taped the entire connection for safety.
  13. Before moving the blimp, be sure to attach it to your body in some way!  The blue clamp strap works well cinched onto the kite winder handle then knotted onto a belt loop.
  14. Now get the camera ready.
  15. The settings should be flash on, manual, continuous, and ISO400.  Be sure the battery is fully charged and that the memory card is empty.  Make sure that the maximum resolution is being used.  For a 16 GB card, that should yield ~2400 potential pictures.  If the camera says there are 9999 pictures remaining, it tells you the resolution is too low.
  16. Attach the camera to the blimp once the settings are confirmed.
  17. The last thing before launching the blimp is to set up the open shutter on the camera.  Saving this for the final step will save you a bunch of pictures. 
  18. Use the device sent with the blimp for holding down the shutter.  Use two rubber bands to secure it to the camera.  Make sure the camera is clicking away as you loft the blimp.
  19. To empty blimp, open the two release valves and gently assist pushing helium out of the blimp.  Blimp needs to be completely empty before wrapping it into the tarp.  Detach the short stay as before from its ribbons and fold it along the other stay for ease of transport.

Blimp Flight Guidelines

  1. FAA regulations only permit a maximum flight height of 500’, but the blimp often goes at an angle, so the spool has up to 1000’ of string.
  2. How high up you go depends on how wide the channel is and what resolution you are aiming for.  ~250’ seems like an ideal balance, but if the channel is too wide, then you might have to go up to the full 500’but the closer to the ground the clearer the pictures.
  3. The best approach to using the blimp is to go right up to the maximum height of 500’ and do a run along the river at that height.  Then drop down to the preferred height and do another run at that height to get the maximum resolution with reasonable coverage.
  4. Depending upon wind conditions, it may take lots of blimp manipulation (more or less height via the kite string), walking, or boat maneuvering to get the shots needed.  Wind plays a big role in how much effort it takes to reel in the blimp.
  5. If the blimp simply will not go up, then that tells you there is an air inversion taking place.  This usually happens when hotter air gets trapped under cooler air, which we have seen several times in canyons.  The cooler air prevents the blimp from rising.  There is no solution other than to hold off until the next morning or when conditions change. 

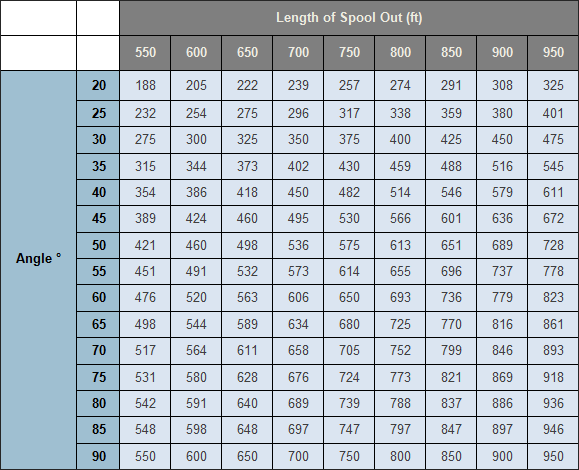
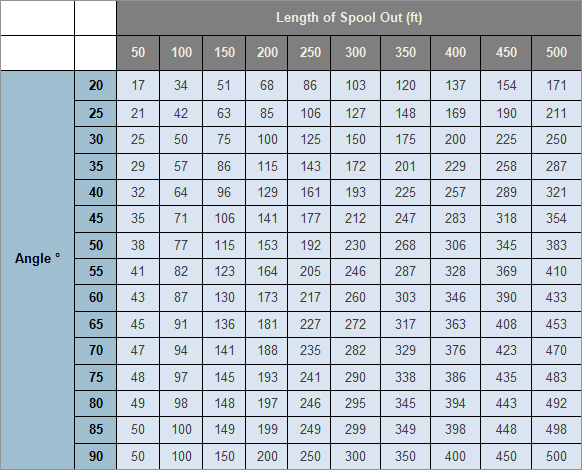
Use these tables to determine the height at which the blimp is flying. The table assumes that there is no slack in the line. Remember to add the height from the ground to the position of the clinometer. 
kiteblimp_01.png

kiteblimp_02.png

Notes on blimp/camera

  1. You will be able to see the flash flashing, so you should be able to tell if the camera is still taking pictures.  I’ve tried the ‘no flash’ setting and it uses up the memory card space in less than five minutes – not good. 
  2. Typically I have the blimp lofted for 30-60 minutes per deployment.  Just keep looking for the flashes and as long as that is going, then you know you are good.
  3. The camera takes pictures every 5-20 s, slowing down over time.  It helps to count out so you know to steady up when a photo is about to be taken.
  4. The most tedious part of the deployment is reeling in the blimp.  It is also the hardest part if it’s windy.
  5. Did I mention to always have the blimp tied down?  We don’t want to lose it!
  6. If it is windy, you may want to weigh down the tiles with a rock so they don’t blow off of their GPS location.
  7. It’s easy to re-deploy the camera again and again once the tiles are in place.
  8. Recharge the camera battery between deployments!!  The one battery will run out of power more quickly than our desire to get more pictures.  Plug the battery and recharge unit into the inverter as soon as you have downloaded the pictures and erased them from the memory card.
  9. Use the time in between deployments to have a good look at the latest pictures.  Use knowledge from previous deployments to figure out where you might need to walk/boat to to get pictures of other needed areas.  
>Kite Blimp Method
  • Home
  • About Me
  • Research
    • Scientific Highlights
    • Projects
      • Near-Census River Science
        • 2DMUs
        • Hydraulic Topography
        • Topographic Change Detection
        • Topographic Change Processes
        • Floodplain Inundation
        • Streamwood Storage
        • Upper South Yuba
        • Salmonid Migration
        • North Yuba River
        • Salmon Migratory Habitat
      • Geomorphic Covariance Structures
      • Synthetic River Valleys
      • Watershed Processes
        • Watershed Sediment Transport
        • Watershed Streamwood
        • Watershed Sedimentation
      • River Rehabilitation
        • Spawning Habitat Rehabilitation
        • Cobble/Gravel Injection
        • Streamwood Jams
        • Geomorphologist's Guide
      • Waterfalls
        • Horseshoe Falls
        • NSEAM 1.0
        • Hydraulic Jumps
        • Small Step Mapping
        • Small Step Hydraulics
      • Tidal Freshwater Deltas
        • TFD Introduction
        • TFD Vegetation
        • TFD Sediment Cycles
        • TFD Ecogeomorphology
        • TFD Hydrometeorology
        • TFD Sediment Transport
        • TFD Modeling
        • TFD Animal Response
        • Bush River, MD
        • Winter's Run, MD
      • Estuarine Processes
        • Salinas River Estuary
        • San Joaquin-Sacramento Delta
        • Blackwater National Wildlife Refuge
        • Long Island Sound
      • Functional Flows Model
      • Volcanic Lakes
        • VL Classification & Modeling
        • VL Bibliography
        • Keli Mutu
          • Remote Sampling Strategy
        • Lake Batur
        • Other Volcanic Lakes
      • Agricultural Sediment
      • Urban Rivers
      • Chaos in Hydrology
      • Channel Types
    • Methods
      • Net Sedimentation Tile (NST) Protocol
      • Sediment Core Processing Protocol
      • Vibracoring Protocol
      • Loss-On-Ignition Protocol
      • C-14 Sample Selection and Prep Protocol
      • Cation Sample Prep and Analysis Protocol
      • Grain Size Distirbution Protocol
      • MS Word Fig. code
      • Kite Blimp Method
      • Laser Granulometer Protocol
    • Software
      • River Builder
    • Sponsors
  • Teaching
    • SAS 004Y : Water in Popular Culture
      • Course Logistics
      • Sections
      • Syllabus
        • SAS004 Introduction
        • Water Scarcity
        • Water Scarcity Discussion
        • Floods
        • Flood Insurance Discussion
        • Water Quality
        • Water Quality Discussion
        • Water & Psychology
        • Water Psychology Discussion
        • Conquering Nature
        • Conquering Nature Discussion
        • Pro Poor Water
        • Pro Poor Water Discussion
        • Arctic Socio-Ecology
        • Indigenous Knowledge
        • Earth Stewardship
        • Earth Stewardship Discussion
        • Global Climate Change
        • Global Climate Change Discussion
        • Coastal Zone in Crisis
        • Coastal Zone Crisis Discussion
        • Course Review
      • Readings
      • Instructor
      • Classroom Behavior
      • Grading Policy
      • Movie Logs
      • Discussion Activities
      • Expository Essay
      • Study Guide
      • Online TA Help
    • ESM 125: River Conservation
      • Syllabus
        • River Conservation Introduction
        • Navigability For Title - Law
        • River Segmentation
        • Historical Hydrology
        • Indigenous River Conservation
        • Habitat Conservation Law
        • Aquatic Habitat
        • Riparian Habitat
        • Water Temperature
        • Sediment Sampling
        • Water Quality
        • CA State Water Boards
        • Biological Opinions
        • Setting Biological Goals
        • County-Level Water Management
        • River Restoration
        • Fish Passage & Fishways
        • Beaver-Assisted Restoration
        • Water Management Lessons
      • Instructor
      • Grading Policy
      • Readings
      • Exams
      • Individual Assignments
      • River Presentations
      • Video Response Canvas Quizzes
      • Reading Response Canvas Quizzes
    • HYD 143 : Ecohydrology
      • Instructor
      • Grading Policy
      • Syllabus
        • Chapter 1
        • Chapter 2
        • Chapter 3
        • Chapter 4
        • Chapter 5
        • Group Activity 1
        • Group Presentations 1
        • Chapter 6
        • Chapter 7
        • Chapter 8
        • Chapter 9
        • Group Activity 2
        • Group Presentations 2
        • Chapter 10
        • Chapter 11
        • Chapter 12
        • Chapter 13
        • Chapter 14
        • Chapter 15
        • Group Activity 3
        • Group Presentations 3
        • Chapter 16
        • Chapter 17
        • Chapter 18
        • Chapter 19
        • Chapter 20
        • Chapter 21
      • Online TA Help
      • Video Response Quizzes
      • Group Presentations
      • In-class Assignments
    • HYD 151 : Field Methods in Hydrology
      • Instructor
      • TA Info
      • Grading Policy
      • Syllabus
        • Chapter 21
        • Chapter 1
        • Chapter 2
        • Chapter 3
        • Chapter 4
        • Assignment 1
        • Chapter 5
        • Chapter 6
        • Assignment 2
        • Chapter 7
        • Chapter 8
        • Chapter 9
        • Assignment 3
        • Chapter 10
        • Chapter 12
        • Chapter 11
        • Chapter 13
        • Chapter 14
        • Assignment 4
        • Chapter 15
        • Chapter 16
        • Chapter 16b
        • Chapter 17
        • Field Equipment Showcase
        • Chapter 18
        • Chapter 19
        • Chapter 20
        • Chapter 22
        • Chapter 23
        • Chapter 24
        • Course Review
      • Readings
      • Online TA Help
      • Field Safety
    • HYD 252: Hillslope Geomorphology and Sediment Budgets
      • Instructor
      • Grading Policy
      • Syllabus
        • Week 1
        • Week 2
        • Week 3
        • Week 5
        • Week 6
        • Week 7
        • Week 8
        • Week 9
        • Week 10
        • Week 4
      • Readings
      • Safety
    • HYD 254Y: Ecohydraulics
      • Instructor
      • Grading Policy
      • Syllabus
        • Introduction to Near-Census River Science
        • Introduction to 2D Modeling
        • 2D Modeling Training
        • 2D modeling discussion & synthesis
        • 2D Modeling Terrain Variability
        • 2D Model Validation
        • Fluvial Landform Assessment
        • Ecological Analysis of Structure and Function
        • Hydrogeomorphic Processes
        • Parameterizing Boundary Roughness
        • Frontiers of River Science
      • Readings
      • Online TA Help
      • Lab Tutorials
    • HYD 256: Geomorphology of Estuaries and Deltas
      • Syllabus
        • Week 1
        • Week 2
        • Week 3
        • Week 4
        • Week 5
        • Week 6
        • Week 7
        • Week 8
        • Week 9
        • Week 10
      • Readings
      • Lab
      • Field Safety
      • Online TA Help
      • Grading Policy
    • Virtual River Methods
      • Syllabus
      • Instructor
      • Grading Policy
      • Readings
      • Assignments
      • Game Setup
  • People
    • MS Students
    • PhD Students
    • Postdocs
    • Committee Advisees
    • Technicians
    • Undergrads
    • Visitors
    • Collaborators
    • Furry Friends
  • Info for Applicants
  • Service
    • Past Service
    • Professional Service
  • Outreach
  • Curriculum Vitae

GET IN TOUCH

  • 223 Veihmeyer Hall
    LAWR Dept., UC Davis
    One Shields Avenue
    Davis, CA 95616
  • (530) 302-5658
  • (530) 752-1552
  • gpast@ucdavis.edu
  • Google Scholar
  • Research Gate
  • ORCID: 0000-0002-1977-4175
  • Dr. Gregory B. Pasternack - Watershed Hydrology, Geomorphology, and Ecohydraulics
UC Davis